
Teaching a horse to be hobbled can be low-stress and have long-lasting benefits if done methodically and safely.
California horseman Bryan Neubert starts teaching horses how to stand wearing hobbles at a young age, if possible, so they are comfortable with the restraint when he uses them for ranch work. He finds that hobbling young horses also prepares them to stand for a farrier, and makes handling the horse’s legs and feet easier. But whether a horse is young or old, Neubert uses the same method to accustom a horse to hobbles.
Neubert draws on decades of experience working with horses and using them to work cattle in wide-open spaces for his teachings.
“When I worked as a cowboy on a big ranch in Nevada, we would brand out in the brush and there was nothing to tie a horse to,” Neubert says. “The only way to leave a horse was to hobble. It was standard procedure.
“Starting horses, it is standard for me to hobble. Even if I know the owner doesn’t own a pair of hobbles, I start the horse with them. This is to help the horse learn to get in a yielding frame of mind instead of a defensive frame of mind.”
Neubert follows a systematic method to start hobbling, using a soft set of leather hobbles—not rawhide—and a long lead rope in an area with soft ground. Each session with a horse—young or older—lasts about 15 minutes, depending on the horse’s frame of mind. Here, Neubert outlines how he safely and confidently teaches a horse to accept restraint.
1. Set The Stage
Neubert prefers to start the first hobbling lesson after the horse has been ridden or worked for the day, so that it is not fresh. He takes the horse into the middle of a corral with soft ground or out in a pasture that is rock-free, using a halter and long lead rope as his tools.
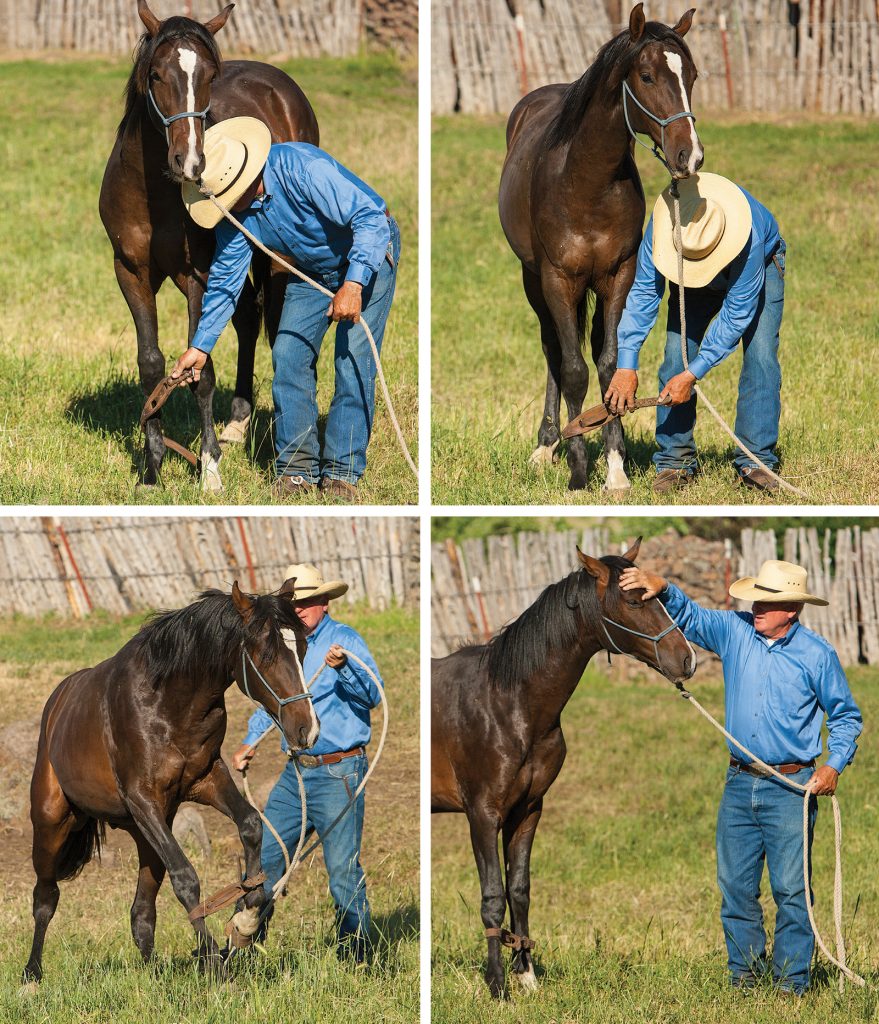
He stands with his head facing the same direction as the horse and starts rubbing his hand down the horse’s front legs.
“I am on the left side of the horse. I don’t want to bend over and take the chance to get kicked on the back of the head if the horse isn’t used to being handled,” he says. “I run my hand down the horse’s [right front] leg and if it stands, I will attach the hobbles to the right [ foreleg] first.”
Standing on the left but attaching the right side first allows Neubert to pull the off foot or push the near shoulder to keep the horse’s feet close together for the hobbles to hook.
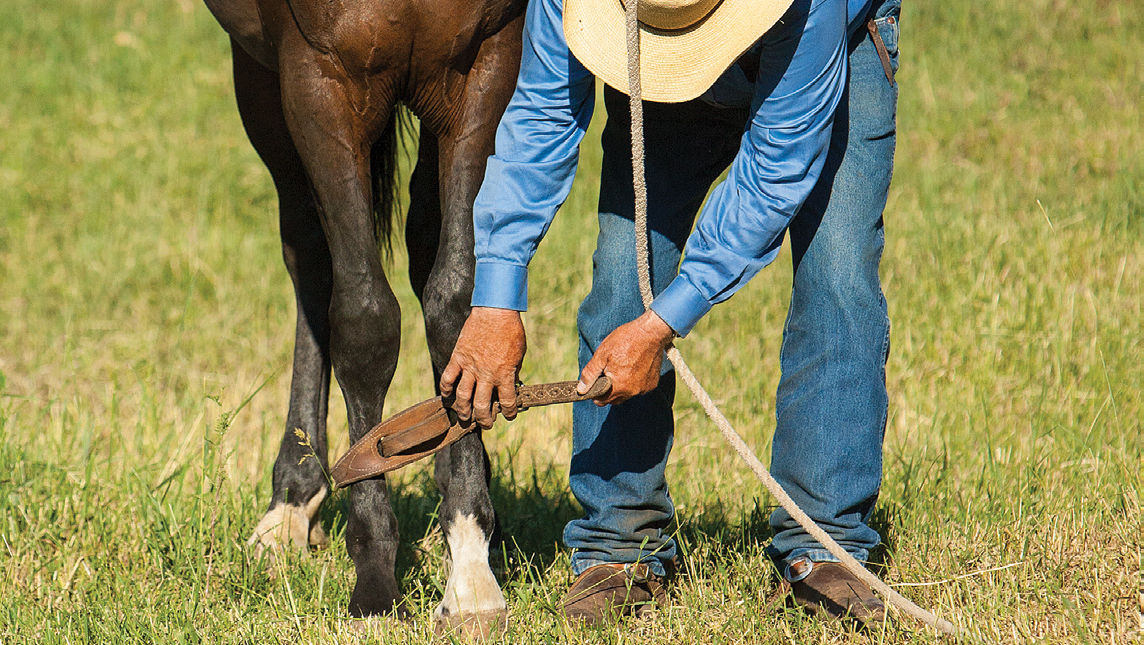
He always uses leather hobbles that won’t rub, and places them high on the horse’s cannon bones. He attaches them with the buckle clasp facing forward, which decreases the chance the horse will step on the leather tail when it moves around. If the horse steps on the tail, it can release the hobbles or break the keeper.
“I put the hobble high on the cannon bone, right under the knee,” he says. “Be sure the hobbles have plenty of holes to adjust to different horses’ sizes. If the hobbles slide down, sand could get in between the hobble and horse’s pastern, and it can take the hair off like sandpaper.”
Once Neubert applies the right hobble, if the horse is accepting of pressure and not moving around or threatening to strike, he attaches the left side. Then he steps back and to the side of the horse—never in front—in case it jumps.
2. Restrain with Patience
It is natural for the horse to struggle, says Neubert, when first restrained. He emphasizes holding on to the lead rope, and staying to the side of the horse. He likens his movements to those of a bullfighter.
“It makes a horse insecure because it can’t spread its feet,” he says. “Some will try to take off, others will come toward you looking for a friend, and sometimes they will run backward and can turn over if not given plenty of slack [in the lead rope]. The horse might fall down. Don’t just stand there when the horse is struggling, but don’t try to outrun a horse in hobbles. Like a bullfighter, step toward the tail, because the horse can’t circle real fast. Step to the tail, step to the side.”
The lead rope is necessary to control the horse’s speed. Neubert cautions against letting a horse learn to travel while wearing hobbles. He gets out of the way if the horse wants to walk or trot slowly. However, if the horse gets into a lope, he pulls the lead rope to disrupt the rhythm.
“I don’t want a horse to figure out how to travel pretty good hobbled,” he says. “I come to this whole thing as a cowboy, and I want to keep that horse where I last saw him.”
Neubert says that a horse may fall down and get its legs sandy. If that occurs, he advises taking the hobbles off after the horse gets up, removing any sand from under the hobbles or on the legs, and then replacing the hobbles so the sand doesn’t irritate the horse’s legs.
3. Test The Horse
Whether a weanling learning to have its legs restrained for the first time or an older horse that understands pressure from years of farrier work, every horse accepts hobbles in its own time. Neubert says most horses figure out how to accept the hobbles in about 15 minutes.
He is sure to offer consolation to the horse once it wants to stand still wearing the restraint.
“I rub on the horse once it is standing still; I call it consoling,” he says. “I stay to the side, not in front, because the horse may take off again. I just get out of the way and when it stops, I console again. Once the horse wants to stand and decides it can live with the hobbles, I may call it a day. The first day, the horse learns quite a bit. I continue to [apply the hobbles] when I have time for it. It doesn’t matter if it is the next day or the day after; just keep working on it.”
When Neubert starts to trust a horse to stand hobbled, he will add a distraction to the situation in the form of another horse. He uses the horse to tease the hobbled one to walk after the horse that is being led or ridden past.
“Usually, [the hobbled horse] tries to follow once or twice before it understands it is easier to stay put,” Neubert says. “My goal is to let the other horse leave and have the hobbled horse stand. Then I may try it out of the corral. A hobbled horse will be more secure with other hobbled horses, so I will try it in a group.”
One thing Neubert doesn’t do is let the hobbled horse graze. Once the horse grazes the area closest to it, it will start to travel to better grass. Additionally, once a horse is hobble-trained Neubert wants the horse ready to head out in a hurry if he is working cattle on the ground and switches to roping, so he leaves the bridle on, reins tied up to the saddle horn, and the horse hobbled to stand.
He says that hobbling has more benefits than simply keeping the horse restrained. It can help the horse stand quietly for the farrier and even prevent injury.
“If a horse is broke to hobble, it is less apt to pull its foot hard when caught in a fence,” he says. “No matter what the horse’s job will be, hobbling helps.”
This article was originally published in the November 2017 issue of Western Horseman.


Can I use this same procedure to hobble a horses back legs? instead of the front.
honestly, you shouldn’t hobble at all, but it is safer to hobble the front